Category: Recipes

  • Fickles? Figckles? Pickled figs????

    Fickles? Figckles? Pickled figs????

    Sometimes I just get an idea for something and it gets stuck in my head until I execute it. I’ve always been curious about the world, specifically the plants on the planet. I want to know them and their story, but I also want to know what they can do and if they’re edible. If so what do they taste like? I’m kinda on this fermentation kick right now. It’s a timeline you get to eat. It’s dynamic and ever evolving, and I think that’s beautiful. Enter figckles.

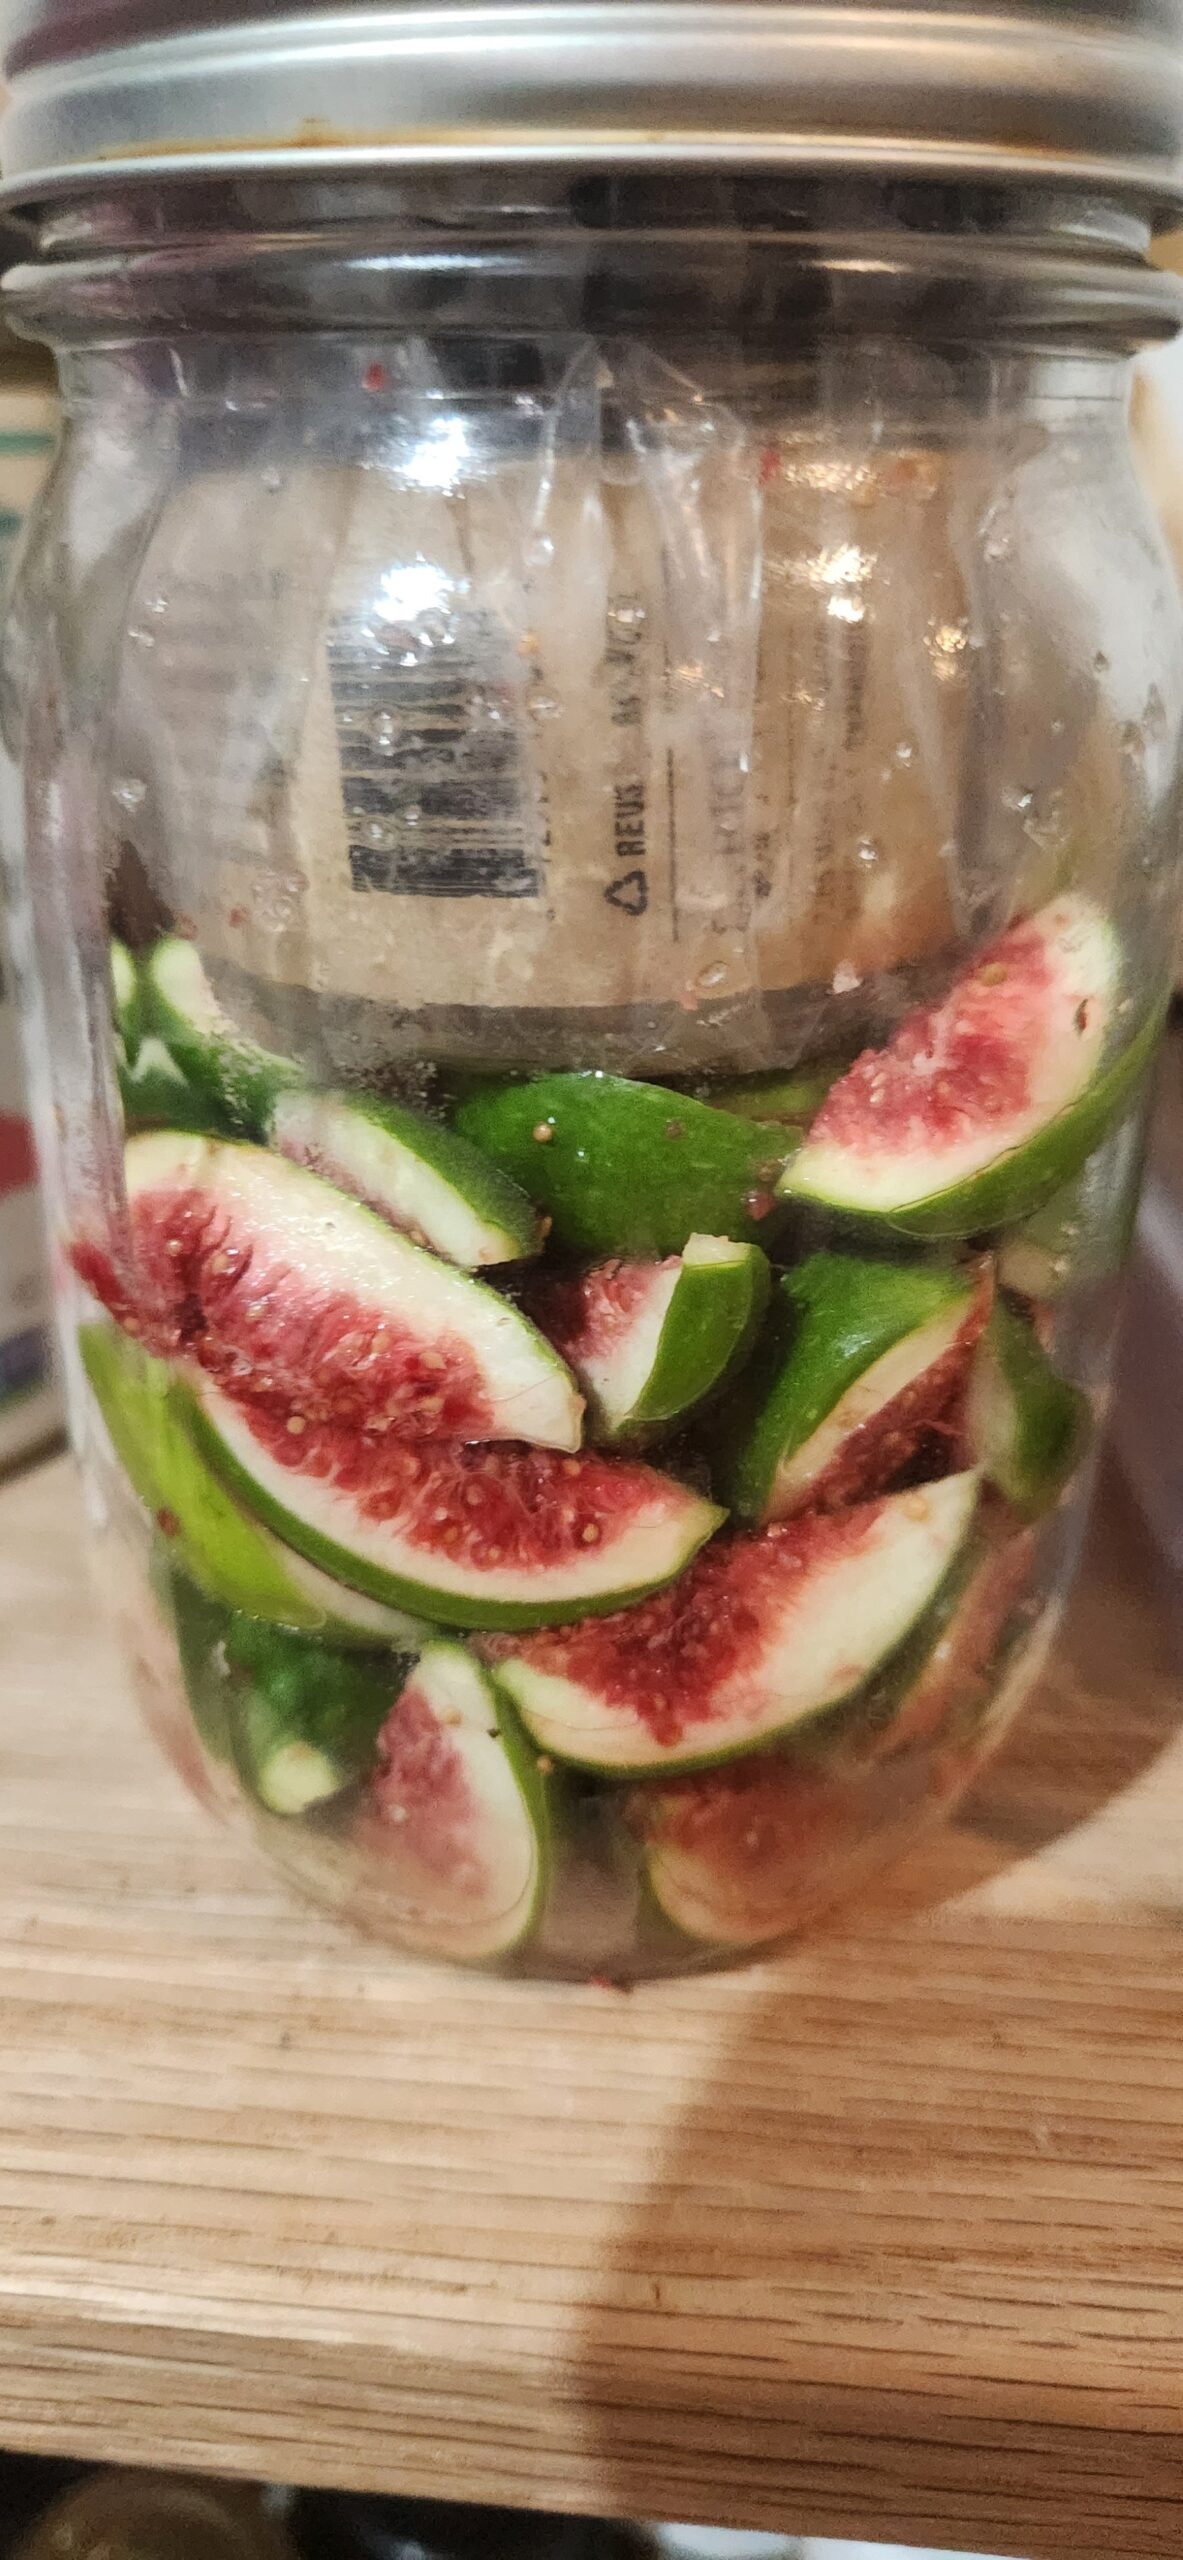
    There’s a fig tree at my great grandmother’s house. I pass a fig tree every week. I see its changes over time, from flower to fruit. Once you pick figs they stop ripening (if you pick them green) but they don’t all ripen by the end of the season. I got to wondering what happened if you lactofermented the semi ripe figs or even the baby ones? Would they soften? Would they be edible? Would they be tasty??? Lacto-fermenting is easy and low-effort (really low risk, high reward). I decided to try it, I didn’t have much to lose. The figs were free; I already had salt, a scale, and a jar. I could make a little weight to keep them pressed down. So one day I harvested some figs, just enough to fit to this small jar. I picked mostly those that were avocado ripe (firm with a little give), except one that was young and hard. I brought them back and did a quick rinse of them under cool water since these were an urban forage and I wanted to remove the latex. I weighed them to calculate how much salt I needed, only 3 grams but I accidentally added too much (5g). I was going to leave them whole but I was worried that they wouldn’t ferment as well and I was following the instructions in the noma guide to fermentation (I must admit my first attempt to lacto ferment DID NOT go well, but that was in the Boston days IYKYK). So I quartered all of the figs except the small rocky one, because again I was curious but also apprehensive.

    After I quarted them I put them back in the bowl, added the salt, and tossed/mixed them together to make sure they were well coated. Then I put them in the jar and added my diy weight. I didn’t have anything really that fit in this and last time I tried using the zip lock bag method in the noma guide my bag burst. Long story short, I was scarred. Instead I used an old spice jar, filled that with water, and placed that in a clean ziplock bag. I stuff it in the jar and pressed down my quarted figs, then made sure it was well sealed by screwing the lid back on. I set it on my new shelving unit (coming soon to the studio apotroes site), and let it sit for a week. I burped (opened it to let the gas escape) the jar every-ish day. I finally shared them with some friends at a pickle picnic! (This is simply a picnic that everyone needed to bring a pickled/fermented thing to share.) I hadn’t tasted these before I brought them but they were a hit! They’re like olives but floral and sweet? I imagine these would be a really interesting sub in a martini or anywhere you normally use olives. Honestly I might chop some up and make some salmon cakes.

    This was day one!
    This is how they looked in the end, but they were a little greener earlier in the day
  • roast chicken, kale, and squash soup

    This is an older recipe that I don’t even have a photo of for some reason (actually I just found a photo from when I made this soup and know exactly why I don’t have any good photos of it iykyk). Anyways this soup is actually my favorite because it takes forever to make, smells amazing, and is even more delicious when consumed. I really love making long dishes. I love this soup in the winter and sadly haven’t made it since moving to NYC but would make it every season in Boston. It’s super simple and really just rewarding. You could, in theory, use store-bought broth for this but I really urge you not to do this, properly made this soup takes like 2 days to make because you have to make the broth from scratch but it’s fun and easy. This also makes a ton of soup which can freeze and eat at a later date. I have done this and it’s still amazing. Will say that I did read a description of something and that very much influenced the descriptions in the recipe.

    Tools:

    6-7.5 Quart Dutch Oven

    Strainer

    baking sheet and mat or foil

    fork and knife

    Ingredients:

    3-5lb of Chicken Backs

    Salt and Pepper

    Oil, preferably avocado or olive

    1 large onion or 2-3 small ones quartered

    Garlic 6 cloves

    2-3 Celery stalks

    1tsp smoked paprika

    A dried chili- chef’s choice (I use chilitepin but thats a little difficult to find bc it’s a wild pepper that grows in the southwest but it provides a staccato type of flavor, sharp upfront with a smoky after taste like warmth from an embrace cut too short. Chipotle is a fine substitute, nora or basque chili are also okay but not as hot)

    1/2tsp Rancho Gordo Chili Powder

    1/2tsp baking soda

    ~2 tablespoons of herbs de romance (Rosemary, oregano, parsley, tarragon, coriander, bay, mint, lemon verbena, oregano flowers, garlic//if you can find herbs de Provence without lavender you can also sub that here)

    1tbsp vinegar

    1 spaghetti squash

    2 bunches of kale

    Chicken (you can do whatever, could be whole pieces could be cubed breasts or thighs really doesn’t matter)

    1 more onion sliced into slivers

    4 carrots sliced

    Instructions

    1. Preheat your oven to 375F.
    2. Mix all the spices and baking soda together in a small bowl
    3. Add chicken back to a large oven-safe pot/Dutch oven and coat them in oil.
    4. Season the chicken with the entirety of the seasoning mix and toss to coat. Add onion, celery, and garlic to the pot and toss again to make sure everything is well mixed (honestly you can add the veg earlier if you want). You should also add salt and pepper.
    5. Roast chicken uncovered for 40min to an hour (until the chicken is brown/roasted). While the chicken is roasting, roast the squash in the oven on the baking sheet (could slice it or roast it whole after poking it with a fork). Cook the squash until it’s soft.
    6. Remove pot from oven and place on stove
    7. Cover the pot with water and add a tablespoon of vinegar. Bring to boil, then reduce to a simmer and cover for honestly like 4-6hrs min but personally I go for the 24hrs. 8hrs is a great sweet spot.
    8. So now you have a wonderful and rich base for your soup. Well, almost you need to strain all of this out and reserve the liquid. You can also remove the excess fat from this by using a metal ladle and bowl of ice water. Dip the ladle in the ice water to drop the temp then skim it over the top of the strained liquid. Repeat until the ladle fails to collect fat.
    9. Soup time. Truly you could stop here and enjoy some very tasty broth but if you want to make my favorite I recommend continuing.
    10. Add the chicken, onion, and carrot (I add them early because I’m allergic to raw carrots so I need them to be thoroughly cooked but you could add them later if you want).
    11. While that’s simmering, shred your squash into strands. When the chicken is nearly done add the squash and kale and cook for an additional 10 minutes.
  • dairy free vegan alts & subs

    If you’re one of the few avid readers of my blog, know me IRL, or follow me on Instagram you know I try to live a dairy lifestyle. This doesn’t always happen and I’ve known to visit the pizza shop near my apartment occasionally but for the most part, I stick with it. Why am I dairy free? Good question. First of all, I’m not really that big on dairy to start so it was pretty easy for me to cut it out for environmental and health reasons. Milk/dairy is kinda gross. It’s cow breast milk, it’s made for baby cows, not humans. I have trouble digesting dairy products so that was another reason I cut it out. I’m also not a huge fan of the texture of some cheeses and cheese products. Conceptually, I think cheese is pretty cool and its history is interesting, but I struggle with eating it. Anyways, I’ve tried a number of dairy-free alternative products over years and I wanted to share a few of my favorites. Do you have a favorite non-dairy alternative?

    “Milks”

    I have 4 favorite non-dairy milks: Ripple unsweetened plain & their new oat milk, Chobani Extra Creamy Plain Oat Milk, and Notco Not Milk Whole. Ripple and Chobani are my go-tos. I buy these two together. Ripple milk is a perfect sub for milk in everything (but drinking the oat one you can drink straight) and is the most nutritious of the plant milks. You can use this to make buttermilk, blend it for smoothies, or cereal literally anywhere you would use milk you can and should use Ripple. I bake with Ripple and use it in my oatmeal, mac, soups, and waffles/pancakes. Chobani is perfect for drinking I love the flavor and texture is better than dairy milk. It’s like the purest milk flavor without the flavor of the cow. It’s truly neutral and clean in flavor. This is the superior oat milk and I highly recommend you try it. Plus Chobani is immigrant-owned and founded. The Notco Notmilk is flavor-wise the most spot on for dairy milk. If you’re nervous about trying non-dairy milk, this is the milk for you. It’s a great sub for dairy milk in cooking and tastes great on its own (or with cookies).

    Cheeses

    Moocho Cheese shreds: These are the only shreds I use. They’re funky and delicious in salads, tacos, or chili. They also last longer than violife which is a huge bonus for me, because honestly, I don’t eat a ton of cheese. I’ve tried the Fiesta blend and the mozzarella on pizza both of which met my expectations.

    Miyokos pizza cheese: I trekked all the way to the upper west side one day to try this cheese. It was perfect. They really knocked it out of the park with this one. I bought a bottle but I haven’t made a pizza yet with it but hope to soon!

    Sheese Bute Feta: Fantastic feta for salads. I brought this and the moocho shreds back with me from Texas because I can’t find them in NYC 💔 which is truly a shame because they’re better than anything I’ve tried up here. I actually bought the violife feta and it’s way too slimy and wet for my liking, the flavor is good but I like my feta drier and crumbled. I want to try other cheese from this company but it’s hard to find even in Texas, but the feta and moocho shreds are available at HEB. I am dying to try caramelized onion cheddar in cheese crackers.

    Violife Parm: Big fan, great stable parm that lasts for a while. I love this in pasta. Just as salty and umami as traditional parm. It will last a year in the fridge once opened and kept in a container.

    Spero goat & herb spreads: I ADORE Spero’s goat cheese, it’s so great on sandwiches or as the base of dressings or in pasta. I love keeping this on hand even though I have to trek miles to get it. I love the herb cheese on my breakfast sandwich with vegan egg, spring mix, and avocado.

    Butter

    I only use one plant-based butter Miyokos. It’s exactly like regular butter in terms of flavor and can be used anywhere you use butter. This butter made me understand why people like butter. Huge fan. I keep blocks in my freezer because I always buy it on sale.

    Yogurt

    There are 3 different brands of yogurt I enjoy all depending on my mood and desires: siggis, culina, and foragers cashew. Siggis is the most like traditional Greek yogurt, even though this is technically supposed to be skyr (which isn’t yogurt but rather cheese 😅). The plant-based siggis isn’t as thick as Skyr and ends up more like Greek yogurt but that’s okay it’s still delicious and protein-rich. Culina is actually thicker and more like skyr, plus it comes in nice little jars that I reuse for spices. I love Culina and it’s a woman-owned business based in Texas. Foragers cashew yogurt is the perfect sour cream sub. I use this in my chickpea salad sandwich mix and tomato soup. I’ll be honest I’ve never tasted this straight but it’s tangy and works well in cooking.

    Bonuses! Plant-based Queso

    Credo foods: I never tried queso before because liquid cheese really makes me nauseous. Just the visual is gross, those stadium nachos with Ricos I’m sorry to say look and smell absolutely disgusting. I tried it once and 🤮. Yeah, not a fan. I learned about Credo food queso while living in Boston but it’s only available in some markets. It’s another Texas company so I tried it when I went home. Truly game-changing. I really loved this as a snack and accompaniment to whatever Tex-Mex I’m eating at home. I’m not used to eating queso so I don’t always grab it but this was really good. I had the chorizo queso which my parents who are not super open to plant-based alternatives also enjoyed.

    Primal Kitchen: This was good. I tried it recently and is a great option if you live in a market that Credo doesn’t serve yet. If I buy some vegan chorizo, I’m definitely mixing them together. The flavor is solid and balanced, the texture is great, and it looks pretty similar to traditional queso.

    I hope you all enjoyed these recs. I’ve had few requests for reviews on products I try so I’m going to try to do more posts like this.

  • dairy free lobster + corn soup

    I’ve made this soup or a version of this soup like 5 times since I first time I made it. It’s slowly becoming a staple and there are a million ways to make it with tinned lobster or frozen or even fresh; using vegetable broth as a quicker method, with frozen corn or fresh corn (I’m sure you could even use canned corn if you wanted), using white potatoes or rice instead of dairy-free milk, crab or scallops instead of lobster…the possibilities are endless.

    I initially drew inspiration from the classic corn and crab bisque. I think this bisque would be really bomb made with green crabs and honestly I would have made it that way if I had green crabs. That’s actually what I wanted to make with tinned crab but Whole Foods didn’t have tinned crab and I really did not want to be bothered with fresh shellfish, but they did have tinned lobster which isn’t actually dairy free so I would sub with frozen lobster instead. Technically this isn’t a bisque, because the broth isn’t made with the shells of crustaceans, but texturally it’s most similar to bisque. I also I really wanted this to be corny and not so seafoody, so I made a broth base out of frozen corn cobs saved from meals in late summer. I highly recommend going the extra mile and saving the corn cobs over time and making this later in the year.

    Standard Ingredients

    ~2 cups Fresh or frozen corn (I love corn so I put a little too much corn feel free to cut this down a bit)

    fresh frozen or tinned lobster (the key is to have it shelled!)

    dried green herb blend (here is a good place to use Curio’s Herbs de Romance, but feel free to sub with a blend of parsley, thyme, oregano and tarragon)

    smoked paprika (hot or sweet works wells, depending on if you prefer your food with a bit more of kick or more mellow)

    vegan butter (again could sub with olive or avocado oil, if you go vegan butter I highly recommend Miyoko’s)

    Salt + pepper

    1 small shallot

    2-3 cloves of garlic

    ingredients you need to pick one of

    dairy free yogurt (good option is Forager Cashew Yogurt) or 2 small white potatoes or 1 cup of rice (I used brown)

    corn cobs (at least 4 but you could do more) or veggie broth (to make this more like a bisque you technically should use crustacean shells but I rarely buy in shell seafood)

    Instructions

    This is super simple essentially you want to heat up the broth and your creamy element and blend, then add corn and cook, finally and lobster at the very end to heat up.

    If starting with corn cobs

    1. Cut the corn cobs into smaller segments about 3-4in length, toss in about 1 tablespoon of oil or melted butter, and roast (either in pot or on a baking sheet) at 400 for 15-20 minutes (alternatively you could char them using your oven’s broiler for about 5 minutes).
    2. If using potatoes cut your potatoes into chunks. In a pot on medium-low, add 2 tablespoons of butter or oil, add potatoes, 1 tablespoon of green herbs, and shallots. Sautee for about 3 -5 minutes.
    3. Remove cobs from oven and add to an 8 cup stock pot along with 1 tablespoon of your herbs, paprika, garlic, and rice if using instead of potatoes; fill with water until there is about an inch of space between the waterline and the top of the pot. Bring to a boil, then reduce to a simmer (there should be little bubbles (~1-2mm) coming to the surface). Simmer for ~1-2 hours or until the water has reduced by half. Don’t rush this.
    4. Remove the cobs from the pot. and blend the potatoes or rice in the broth using your blender. If you’re not using the potatoes you can just remove the cobs.

    If starting with veggie broth

    1. In a pot, add 2-3 tablespoons of butter (oil). Add shallot, 2 tablespoons of green herbs, paprika, garlic, and potatoes if using. Sautee on low until fragrant and shallot is soft.
    2. Add broth and rice if using to pot and stir. Cook potatoes or rice until soft and blend.

    Soup steps

    1. Add corn to pot of your broth and cook for about 7 minutes.
    2. Turn off stove. Add approx. 1/2 -3/4 c of yogurt and mix (you could add this before you cook your corn and blend it with your immersion blender but I don’t like cooking yogurt). Add frozen lobster if using.
    3. Serve soup in your vessel of choice, with buttered crunchy toast, and top soup with your cooked lobster on top.
  • eating invasives (Green Crab Dumpling Recipe)

    eating invasives (Green Crab Dumpling Recipe)

    If you follow me on Instagram, you probably remember when I had a bunch of crabs in the kitchen. Well I’m finally going to explain what that was all about…

    green crabs in a box
    Some of my crabs being boxed up


    I’m not one to back down from a challenge especially when it’s in the kitchen and I love doing sustainable things, enter the green crabs. Green crabs are invasive in the US. This is bad because they have no natural predators, destroy the habitat, and eat everything they can. Eating invasives is very good for the environment because it protects endemic and native critters. You can’t over eat them. Green crabs are mostly on the East and West coasts, so if you live on one of these coasts it’s definitely a food you should try. I got my green crabs for free via the Shuck at Home Program from Green Crab Org (which if you’re in Boston I would recommend participating!). I signed up for ~5 pounds of crabs but I think I ended up with double that, which let me tell you is a lot of crabs. I thought about what I wanted to cook with what I thought was going to 5lb of crabs for like a week and finally settled on dumplings. I love dumplings, so much. I’ve only made dumplings one other time in my life and they were terrible, completely inedible. I learned to make dumplings from watching one of my fellow scoopies. I understood the process so much better after that even though I wouldn’t end up making dumplings for another 2 years. I am in no way an expert dumpling maker as when I made these it was my second time ever making them. This was a fun and interesting way for me to make a large batch of snack food and try my hand at dumpling making again (aka redeem myself in my eyes).

    my box of green crabs
    my box of green crabs in the sink being cleaned


    There were many challenges to recipe and honestly I don’t know if this is the best recipe for these crabs but it worked after trail and error. I literally had no clue what I was doing and research extensively while cooking because these were not working. This is probably the most time intensive recipe I will ever share. I highly recommend putting on a long series or a few movies because you will be in the kitchen for a while. The upside? You’ll have like over 100 dumplings and you’ll have the richest crab stock to use for so many dishes, in short you’ll eat for weeks maybe even months! I highly recommend clearing some freezer space because you will not use everything the day you make them. Oh and eat before you start because it’s a lot of work. Honestly I would have loved some soft shell green crabs because then I could have just fried them and been done but that’s not this. (side note: if you love blue crabs I would really recommend eating green crabs instead and asking for those where ever you buy blue crabs because blue crabs are endangered (i.e. don’t eat them!) and the preferred food source of whooping cranes, eat green crabs instead to help the environment).


    This is a time intensive recipe, I’m trying to figure out some other less intense recipes but I promise you this is well worth it. This is one of those things that’s fun to do with friends or family or even alone. You could also use this technique to make a stuffed pasta like ravioli

    Green Crab Dumpling Recipe
    Things you’ll need to cook the crabs:

    • The largest pot you have (I didn’t have a big pot when I made these so I used 3 different pots that were approx. 8 quarts each. I personally I would use a 20 quart pot or larger)
    • Seasoning (you can use old bay or a mixture of bay leaves, oregano, dried chilis, and peppercorns//use whatever seasoning you want the dumplings don’t really need the broth, you can use the stock to make soup, polenta, gumbo, or pasta anything really)
    • Vinegar (I put like a quarter cup in each pot of water (so a quarter cup per 8 quarts), this helps soften the shell which trust me you want to do)
    • a sieve
    • a large bowl
    • a funnel
    • a rubber spatula
    • A medium sized bowl
    • a few quart containers
    • TONGS- these need to be sturdy
    • A mallet or jar
    • A drain plug strainer
    • Freezer space, large enough and flat enough to keep store your baking sheet or cutting board

    Things you’ll need to make the dumplings:

    • fresh ginger ( I used about a quarter inch grated but you can use more or less depending on taste)
    • low sodium soy sauce (about a quarter cup)
    • Chinese 5 spice (optional)
    • cabbage 1 small head
    • carrots 3
    • onions 1 (medium sized)
    • garlic 1-3 cloves
    • optional: chili paste or chili flakes
    • dumpling wrappers
    • a large bowl
    • Cutting board + knife
    • toasted sesame oil
    • Large pan
    • a small spoon
    • large freezer bag

    Obviously you’ll need the green crabs

    This recipe has multiple parts, I recommend reading this through before attempting to cook anything, first we’ll start with cooking the crabs because they need to cool a little before you can handle them.

    This was my set up. I would not recommend doing 3 smaller pots.
    1. Fill your pot(s) with water (if you’re in an older building I recommend using cold water to minimize exposure to lead) about 60-75% of the size of the pot, add your seasoning to the pot, and bring it to a vigorous boil.

    While you’re waiting for your water to boil, we’re going to clean the crabs and prep the stuff for the dumplings.

    1. The crabs are living creatures and they do not want to be killed but this a mercy killing. They may try to pinch you with their claws which is why you have tongs.
      1. First plug your sink with a strainer, this is every important! You don’t want the crabs to escape because they’re bad for the environment. One of mine did and I had to turn on the garbage disposal to ensure it didn’t escape alive😞
      2. Dump the crabs in the sink and run cool water over the crabs to clean them for approximately 5 minutes. You want all debris removed from the crabs.
      3. Rinse the container the crabs came in and set aside
      4. Using the tongs add the crabs back into the container they came in, and keep the lid on them
    2. Slice your onion and carrots into thin slivers. Cut off the tops and ends of each veggie, then cut them in half and slice into the slivers. Mince your garlic. Set aside.
    3. In a large skillet, add about 1 tablespoon of sesame oil (and 2 of avocado oil) and heat on medium to low heat. While the pan is heating return to the crabs.

    Cooking the crabs

    cooked crabs
    the crabs will be red when cooked
    1. Once the water is boiling vigorously dump the crabs in the pot(s). If you are using multiple pots add enough crabs to raise the water lever but not so much that the water overflows.
    2. The crabs are cooked once they change colors and stop moving (the color change is the biggest difference and the easiest indicator). This will take about 10 minutes depending on the size of the pot and the amount of crabs.
    3. Once the crabs are cooked, turn off the heat and let cool in the pot, while you return to the dumpling filling.

    Cooking the dumpling filling

    1. While the crabs are cooking return to the pan. Once it is warm add onions, carrots, chili flakes, ginger, Chinese 5 spice, and garlic and sautĂŠ. If using chili paste, mix chili paste with soy sauce and set aside.
    2. Once onions are nearly translucent, add cabbage to pan and mix well. Add your soy sauce (mixture) and cook down the cabbage until it is no longer raw and fully cooked, about 10-15 minutes. Stir occasionally. Once cooked, turn off heat and remove pan. Allow to cool while you work on the crabs.

    Collecting the meat

    Crab meat in a bowl with a spoon.
    So technically you will have a mixture of crab meat and roe. This is fine
    1. Save the broth you will need it to obtain the crab meat. Using the tongs, remove the crabs from the pot into a clean container(s) or baking sheet(s). Let cool enough so that you can handle them without the tongs.
    2. (This a Vietnamese method and it worked pretty well.) In the sink, place your large, and place the sieve over the bowl and add 5-7 crabs to strainer and mash! You want to crush the crabs very well into coarse chunks.
    3. Grab one of your quart containers and scoop the broth/boiled water out and pour it over the crushed crabs. Repeat this a few times, I did it about 5 times per batch (essentially until the liquid no longer flowed through the strainer) and reused the liquid. Remove crab shells from strainer and use the spatula or spoon to scoop out the meat which is all that should be left behind and place it into a separate clean bowl. You will repeat this process until you have done this with all of the crabs.
    4. Once you have finished the crabs add the meat to the cabbage mixture and mix thoroughly. Now we make dumplings! First, however, clean up and maybe take a little breather.
    5. At this point, you can discard all your crab shells either in your compost bin or in the trash. Decant your broth into containers to cool fully, leave space because this is water-based so it will expand once frozen, and freeze once cool (you want the liquid to cool in about 30-60 minutes before freezing). Put your dishes in the dishwasher or hand wash and set aside. You will need a small bowl or cup of water, cutting board, and baking sheet lined with parchment (the parchment is optional). Everything else can be put away.

    Making the dumplings

    dumpling on a baking sheet
    I actually use these silicone mats instead of parchment. I got them from target and I love them.
    1. On a clean cutting board or flat surface place your dumpling wrapper. Scoop about a half tablespoon of the crab and cabbage mixture onto the center of the dumpling wrapper. Wet your finger and run it around the circumference/perimeter of the wrapper and fold, press the edges down to ensure it is sealed. Pick up the dumpling and pinch the edges (please watch a video on how to do this). I will be honest my first few were not good but you will end up making around 100 dumplings so you will develop the skill throughout this process. I am much better at this now. Place the dumpling on the baking sheet lined with parchment Repeat this process until you fill the baking sheet with rows of dumplings leaving about a half-inch of space between them.
    2. Place the baking sheet in the freezer for about 15-20 minutes. You are flash freezing the dumplings so you can eat them later. You want the outside of the dumpling to cold and slightly frozen. Once they have reached this state you can store them in a container or large freezer bag in your freezer.
    3. Repeat this process until all of the dumplings are frozen. If you want to cook some, I recommend cooking the amount you want right after you fold them.

    Cooking the dumplings

    1. In a pan, heat about a tablespoon or 2 of sesame oil over medium heat.
    2. Once hot add the dumplings, either fresh or frozen, flat side down and cook until the bottom is browned a little (about 2 minutes if fresh, about 4-5 if frozen).
    3. Add a scant quarter cup of water to the pan and cover. The dumplings will now steam and will be ready once all of the water has evaporated.
    4. Serve immediately with soy sauce or a dumpling sauce (I would like to recommend the Zhong sauce by fly by jing but mine was stolen so I never got to try it)

    That’s it! Normally I don’t make recipes this involved but I wanted something fun to try and it was literally the middle of the pandemic so I had a bunch of free time.